Austin A40 Farina jammed door catch
A couple of years ago, our Mk1 A40 Farina suffered a jammed door catch. This left the door unable to be opened from the outside or inside of the car. Not really wanting to cut the latch block out of the B-pillar, to get the door open, I contacted a fellow member of the UK Farina Club, to see if some light could be shed on an alternative procedure.
It turned out that this "lock jamming" on Farinas was a reasonably common problem, even way back in the day, and just became more common as the years went by and the lock mechanisms began to wear out, from much opening and closing of the doors. This of course was much more prominent on the driver's side door. The problem eventually led to BMC putting out diagrams to the Dealers, showing how to release the doors once they had jammed shut.
A couple of members of the UK Farina Club offered advice and copies of the original BMC diagrams which were sent to me, so I could follow the instructions and re-open the driver's door on our car.
Once the door was opened, I took the lock out and fully inspected its operation, to see if I could find out what had gone wrong. It didn't take very long to discover what had happened. The "pushing tag" on the "door button" mechanism had slipped in front of the "tag" on the "latch post" mechanism. This meant when the door button was pushed in, there was nothing for its tag to push against to open the door.
Similarly, when the inside door handle was operated, which pulls up the latch post mechanism on its own, it could not pull it up far enough to open the door, because with the door button tag being in front, it acted as a 'packer' preventing the draw-up going the required distance.
I replicated the operation of the lock by hand many times, and discovered that quite often the door button tag was able to slip past the latch post tag, ending up on the wrong side. I realised I had a very worn out lock, and simply putting the tags back in their right place, was not going to be an option, as the door would jam again fairly quickly.
The blow-by-blow explanation of how and why this door jamming occurs sounds complicated, but it's not really, once you get your head around it. They say a picture is worth a thousand words, so I have added photos I took at the time, of how the opening of the jammed door is achieved, plus photos of the worn out lock with the two 'tags' in their 'right' and 'wrong' places. I have also added copies of the original BMC diagrams, which give a few measurements required and instructions.
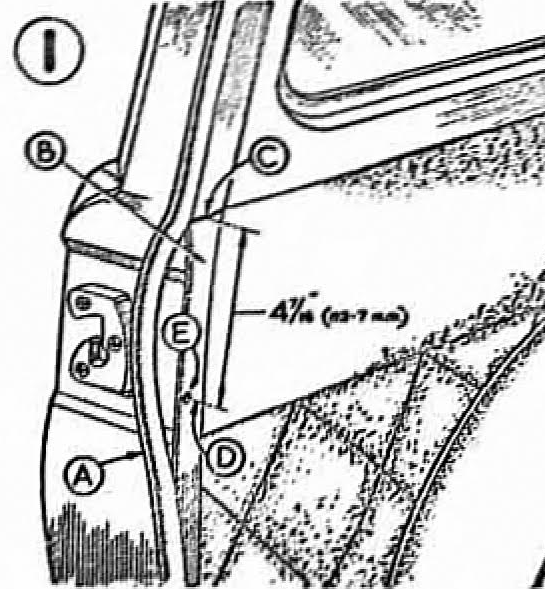
I drew two black permanent marker arrows on the car door and door post, to show where the 4 7/16" measurement is taken from, on top of the door card retaining flap down to where the 1/4" hole is drilled in the door-piping flange, for the 1/8" to 3/16" wire rod to go through.
As the door post is off-set to where you are able to measure from above the door card retaining flap, you will need a good eye or a rule, to project the measurement across to the door post.

Shows 4 7/16" measurement down to where a 1/4" hole is drilled through the door-piping flange. Drill this hole as close to the edge of the flange as possible.

Shows the wire rod in place in the hole through the door-piping flange. When the rod is pushed down after locating it under the latch post, the latch post will pop up, releasing the door. The diagram shows how this works.

Shows the door button tag in its "correct" position behind the latch post tag, ready to push.

Shows the door button tag in the "wrong" position, in front of the latch post tag, with nothing to push on.
As my door lock was well worn out, I got in touch with Derek Minter, the UK Farina Club parts guru at parts@a40farinaclub.co.uk to get him to send me a brand new lock to put back into the car. The Farina Club keeps a number of these locks, which are NOS. Just nominate which side of the car is required. Derek also has some keys in stock and if you are really lucky, you may get a new lock with the same key number as your original locks. I wasn't that lucky, but it didn't matter. I was just pleased to be able to get a brand new lock in 2019!
I would strongly advise putting in a brand new lock if you have a door jamming incident, as Farina door locks are not easy to get in or out. It's not the type of exercise you would want to be doing regularly. While changing my lock, I made a lower access hole in the inside door panel larger, so I could reach up to where the lock is maneuvered into place a bit easier.